

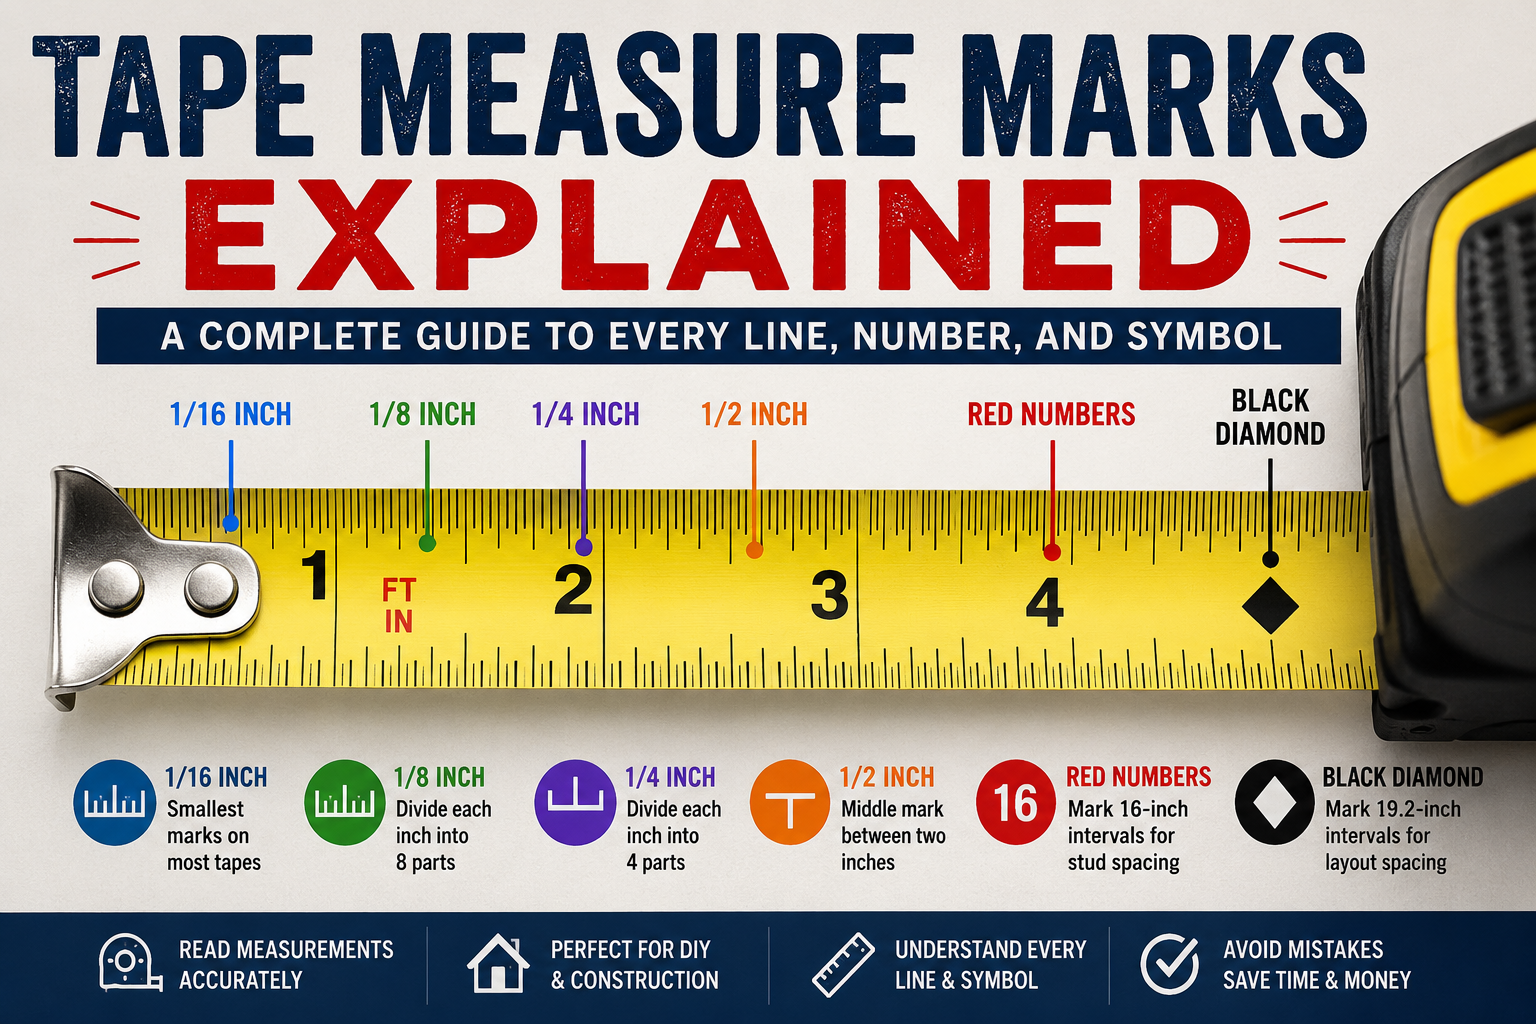
A tape measure seems simple until you pull out the blade and notice dozens of lines in different lengths, numbers in multiple colors, black diamonds, arrows, and markings that are not immediately obvious.
For someone who has used a tape measure for years, these details may feel familiar. For a beginner, though, the space between two inch numbers can look like a crowded row of nearly identical lines. Misreading even one of those lines can leave you with a shelf that does not fit, a board cut too short, or mounting holes placed in the wrong position.
The good news is that tape measure marks follow a clear pattern. Once you understand how line length, fractions, metric divisions, and construction symbols work, reading a tape becomes much faster.
Tape Measure Marks
Tape measure marks are the lines, numbers, and symbols printed or stamped along the blade. They divide a length into measurable units, allowing you to measure whole inches, fractions of an inch, centimeters, or millimeters.
On an imperial tape measure, the numbered lines usually represent whole inches. The smaller tape measure marks between inches divide each inch into fractions such as halves, quarters, eighths, and sixteenths. Some precision tapes also include thirty-second-inch divisions.
Metric tape measures work differently. Instead of fractions, they use centimeters and millimeters. Each centimeter is divided into 10 equal millimeter sections.
Understanding tape measure marks and their meanings is easier when you pay attention to the length of each line. The longest lines represent the largest measurement divisions, while shorter lines show smaller fractions.
Why Are Some Tape Measure Marks Longer Than Others?
Different line lengths help you identify fractions without counting every tiny mark from the beginning of an inch.
On most imperial tape measures:
- The longest line marks a whole inch.
- The second-longest line marks half an inch.
- Slightly shorter lines mark quarter inches.
- Smaller lines show eighths.
- The shortest common lines show sixteenths.
- Extra-fine tapes may also include thirty-seconds.
This visual pattern is one of the most useful parts of tape measure marks explained for beginners. Once you learn to recognize the line lengths, you can often identify a measurement at a glance.
How to Read Tape Measure Marks in Inches
To read a measurement in inches, start by locating the last complete inch before the point you are measuring. Then identify the fractional mark that comes after it.
Suppose the edge of a board falls between the 5-inch and 6-inch numbers. The measurement is not simply 5 inches. You must count or recognize the smaller mark after the 5-inch line.
Before measuring, check the smallest divisions on your tape. Most household and construction tape measures divide an inch into sixteenths, but simpler models may only show eighths.
Whole-Inch Marks
Whole-inch marks are the easiest to recognize. They usually have the largest printed numbers and the longest vertical lines.
The numbers increase as you move away from the metal hook. On longer tapes, every 12 inches may also be labeled as a foot measurement. For example, the 24-inch mark may include a small “2F” or another indication that it equals 2 feet.
Half-Inch Marks
The half-inch mark sits exactly in the middle of two whole-inch numbers. It is normally the second-longest line on the tape.
For example, the middle line between 6 and 7 inches represents:
6 1/2 inches
You do not need to count several marks to find it. Look for the longest unnumbered line between the two whole-inch marks.
Quarter-Inch Marks
Each inch can be divided into four equal quarters. The quarter-inch marks appear at:
- 1/4 inch
- 1/2 inch
- 3/4 inch
- 1 inch
The 1/4-inch and 3/4-inch lines are usually shorter than the 1/2-inch line but longer than the eighth- and sixteenth-inch lines.
Although 1/2 inch is technically the same as 2/4 inch, measurements are normally written in their simplest form.
Eighth-Inch Marks
When an inch is divided into eight equal sections, each section measures 1/8 inch.
The measurements within one inch are:
- 1/8 inch
- 1/4 inch
- 3/8 inch
- 1/2 inch
- 5/8 inch
- 3/4 inch
- 7/8 inch
- 1 inch
This pattern is useful when learning how to find half, quarter, and eighth inches on a tape measure. Notice that some fractions simplify. For example, 2/8 becomes 1/4, while 4/8 becomes 1/2.
Sixteenth-Inch Marks
Most standard construction tapes divide each inch into 16 equal parts. The sixteenth-inch lines are usually the shortest lines on the blade.
Imagine that the edge of a piece of wood falls on the seventh small mark after the 4-inch number. The measurement would be:
4 7/16 inches
When learning how to read 1/8, 1/16, and 1/32 marks on a tape measure, focus on the pattern rather than trying to memorize every line at once. Half-inch lines are longest, quarter-inch lines are slightly shorter, eighth-inch lines are shorter again, and sixteenth-inch lines are the smallest on many common tapes.
Thirty-Second-Inch Marks
Not every tape measure includes thirty-second-inch divisions. These extremely small marks are more common on precision measuring tools used for detailed woodworking, machining, or metalworking.
If a tape divides each inch into 32 parts, the lines can look crowded. Take your time and confirm whether the smallest marks represent 1/16 or 1/32 inch before recording a measurement.
How to Read Tape Measure Marks in Millimeters and Centimeters
Metric tape measure marks are based on groups of 10, which many people find easier once they understand the layout.
The larger numbered marks usually represent centimeters. Between each centimeter number, you will find 10 smaller millimeter divisions.
Centimeter Marks
Centimeter marks are usually longer than millimeter lines and are often numbered clearly. One centimeter equals 10 millimeters.
If an object reaches the large line marked 8, its length is 8 centimeters, assuming the measurement begins at zero.
Millimeter Marks
Each small line between two centimeter numbers represents 1 millimeter. The fifth millimeter line is often slightly longer, making the halfway point easier to spot.
For example, a measurement that reaches four small marks after the 7-centimeter line equals:
- 7.4 centimeters
- 74 millimeters
When reading tape measure marks in millimeters, count from the previous centimeter number rather than from the beginning of the tape.
Metric vs Imperial Tape Measure Marks: What’s the Difference?
The biggest difference is the way smaller measurements are divided.
- Imperial tapes use inches, feet, and fractions.
- Metric tapes use centimeters, meters, and millimeters.
- Imperial measurements may include fractions such as 3/8 or 7/16.
- Metric measurements use decimal-based groups of 10.
- Dual-scale tapes show millimeters and inches on the same blade.
Neither system is always better. The right choice depends on your project, the plans you are following, and the measurement system commonly used in your area.
What Do the Red Numbers on a Tape Measure Mean?
The tape measure red marks meaning is closely connected to construction.
On many tape measures, every 16-inch interval is highlighted in red. These markings help builders locate standard wall-stud spacing quickly. Common red numbers include 16, 32, 48, 64, and 80 inches.
So, what does the 16-inch mark mean on a tape measure? It usually shows a common on-center spacing used when framing walls. “On center” means the distance is measured from the center of one framing member to the center of the next.
These tape measure marks for studs can help with:
- Planning wall framing
- Estimating stud positions
- Spacing structural components
- Installing sheets of wall material
- Checking an existing layout
Not every building uses 16-inch spacing, and not every red marking has the same purpose. Check the design of your particular tape before relying on the color alone.
What Do the Black Diamond Marks on a Tape Measure Mean?
Tape measure black diamond marks are another construction-related feature. They are generally placed at intervals of approximately 19.2 inches.
This spacing allows six framing members to be positioned evenly across an 8-foot length. It may be used for certain floor joist, roof, or engineered framing layouts.
The black diamonds are not additional measurement units. They are visual layout guides. You can ignore them when measuring furniture, hanging pictures, or completing ordinary household tasks.
Knowing what the black diamond marks on a tape measure mean can prevent confusion, especially because they may appear without a written explanation on the blade.
What Do the Arrows and Symbols on a Tape Measure Mean?
Tape measure symbols explained in one guide can be tricky because manufacturers do not all use the same design.
Along with red numbers and black diamonds, you may notice:
- Arrows pointing to regular spacing intervals
- Foot indicators every 12 inches
- Bold blocks around selected numbers
- Metric and imperial labels
- Blade-length information
- Accuracy or manufacturing markings
- Brand-specific construction guides
Some arrows highlight stud spacing, while others simply draw attention to foot measurements or common layout points.
If you are wondering what the arrows and symbols on a tape measure mean, check the packaging or the manufacturer’s product information. Why different tape measures have different markings often comes down to their intended use. A builder’s tape may include layout symbols that would be unnecessary on a basic household model.
Carpenter’s Tape Measure Marks vs Standard Tape Measures
A carpenter’s tape measure and a standard household tape can both measure length, but they may be designed for very different types of work.
Carpenter’s Tape Measures
Carpenter’s tapes often include:
- Wider, more rigid blades
- Red stud-spacing marks
- Black diamond indicators
- Stronger end hooks
- Longer blade standout
- Durable cases
- High-contrast numbers
- Printed fractions on beginner-friendly models
A wide blade can extend farther without bending, which makes it easier to measure across boards, walls, and open spaces.
Standard Household Tape Measures
A household tape usually has a lighter, simpler design. It may be better suited for:
- Measuring furniture
- Hanging curtains
- Checking room dimensions
- Planning picture placement
- Measuring storage spaces
- Completing craft projects
Some household models leave out construction symbols entirely, which can make the blade less cluttered.
Digital Tape Measure vs Traditional Tape Measure Marks
A digital tape measure may show the result on a screen, while a traditional tape requires you to read the marks directly.
Digital models can be useful when measurements are difficult to see or when you want quick conversions. However, batteries can fail, displays can be hard to read in bright light, and electronic readings may still need to be checked.
Understanding traditional tape measure marks remains useful even when you own a digital model.
How to Use Tape Measure Marks for Home DIY Projects
Knowing how to use tape measure marks for home DIY projects can save time, money, and materials.
You may need accurate measurements when:
- Buying shelves for an alcove
- Measuring windows for blinds
- Planning a gallery wall
- Checking whether furniture fits through a doorway
- Marking wood before cutting
- Installing brackets
- Measuring countertop space
- Positioning curtain rods
When learning how to read tape measure marks for woodworking, accuracy becomes especially important. A small mistake may affect the fit of joints, panels, shelves, or trim.
The same applies when learning how to read tape measure marks when cutting wood. Measure from the correct starting point, keep the tape straight, and mark the exact fraction rather than rounding it.
How to Mark Measurements Without Making Common Mistakes
A reliable measuring process looks like this:
- Place the hook securely against the starting edge.
- Pull the tape straight across the material.
- Find the last complete inch or centimeter.
- Identify the smaller mark after that number.
- Make a thin pencil line.
- Check the measurement again.
- Mark the waste side before making a cut.
A thick pencil line can cover several sixteenth-inch marks, so use a sharp pencil or a marking knife when precision matters.
Common Mistakes People Make When Reading Tape Measure Marks
Many inaccurate measurements come from small habits rather than a lack of ability.
Common mistakes people make when reading tape measure marks include:
- Counting lines instead of spaces
- Starting from the wrong point
- Forgetting the whole-inch number
- Confusing eighths with sixteenths
- Holding the blade at an angle
- Allowing the tape to sag
- Reading the wrong scale on a dual-sided tape
- Rounding a fraction too early
- Making an overly thick mark
- Using a damaged hook
People also sometimes struggle with how to read a tape measure when the numbers are upside down. This often happens because of the direction in which the tape is pulled. You can turn the tape, change your position, or rely on the line pattern once you become comfortable with it.
For precise work, always look directly above the measurement. Viewing the tape from the side can make the mark appear slightly shifted.
Why Is My Tape Measure Measurement Inaccurate?
When two measurements do not match, the problem may not be your reading. The tape itself could be damaged or used incorrectly.
Possible causes include:
- A bent end hook
- Dirt trapped behind the hook
- A stretched or kinked blade
- Measuring across a curved surface
- Blade sag over a long distance
- Comparing tapes with different tolerances
- Using the case incorrectly for an inside measurement
The loose movement of the metal hook often worries new users, but it is normally intentional. The hook slides slightly to compensate for its own thickness.
When you pull the hook against an outside edge, it moves outward. When you push it against an inside surface, it moves inward. This small adjustment helps the tape provide a more accurate reading in both situations.
Tape Measure Marks Worn Off: What Can You Do?
Faded tape measure marks can make an otherwise simple project frustrating.
Start by wiping the blade gently with a soft cloth. Dirt, sawdust, grease, and paint residue may be hiding the markings. Avoid harsh cleaning methods that could remove more of the printed surface.
When important tape measure marks are worn off, you can:
- Use brighter lighting
- Compare the damaged area with another tape
- Avoid the worn section for precision work
- Replace the tape if numbers are missing
- Choose a high-contrast model next time
- Look for a tape with printed fractions
Handwritten replacement marks may be acceptable for rough estimates, but they should not be trusted for precise cutting or installation. Replacing a damaged tape is usually cheaper than replacing incorrectly cut material.
How to Memorize Tape Measure Marks
You do not need to memorize every fraction on your first attempt. Start with the most recognizable lines and build from there.
A useful order is:
- Learn whole inches
- Find the half-inch line
- Identify quarter-inch lines
- Add eighth-inch marks
- Practice sixteenths
- Move to thirty-seconds only when needed
A tape measure marks explained with pictures chart can help, but hands-on practice is usually more effective. Measure objects around your home and say each fraction aloud.
You can also compare equivalent fractions:
- 2/4 equals 1/2
- 4/8 equals 1/2
- 2/8 equals 1/4
- 6/8 equals 3/4
- 8/16 equals 1/2
This turns the blade into a simple guide to inches, fractions, and tape measure lines rather than a row of confusing marks.
A Simple Practice Exercise
Use your tape measure to locate the following points:
- 3 1/2 inches
- 5 3/4 inches
- 7 3/8 inches
- 9 5/16 inches
- 45 millimeters
- The first red 16-inch mark
- The first black diamond mark
Then measure a few everyday objects, such as a book, table, picture frame, or cabinet door. Record each measurement without rounding it.
After a little practice, you will stop counting every tiny line. The different lengths, fractions, numbers, and symbols will begin to feel like a familiar visual pattern.